Growing Autoflowers: A Complete Seed-to-Harvest Guide
Growing autoflowers is one of the most rewarding ways to grow cannabis. Fast lifecycles, compact plants and no light schedule management required. Whether you're growing autoflowers indoors under LEDs or running a few pots on a sunny patio, this complete autoflower grow guide covers everything you need to know from seed to harvest.
You'll find a full week-by-week breakdown, indoor and outdoor setup tips, soil and nutrient schedules, and clear answers on when and how to harvest.
What Are Autoflowers?
Autoflowers are cannabis plants that flower automatically based on age, not changes to their light schedule. That trait comes from Cannabis Ruderalis genetics — a subspecies that developed in cold, short-season climates where plants had to complete their lifecycle fast.
Modern autoflowering strains cross ruderalis with indica and sativa genetics to preserve that automatic flowering trait while boosting potency, yield and aroma. Most autoflowering cannabis plants go from seed to harvest in 8-12 weeks depending on the strain and growing conditions. Some slower varieties run to 13-14 weeks.
Why Grow Autoflowering Cannabis Seeds?
Autoflower weed seeds deliver a fast, compact grow cycle that's simpler to manage than photoperiod strains. Here's why growers choose them:
- Speed: Most autos go from seed to harvest in 8-12 weeks, making multiple harvests per season possible outdoors.
- Size: Plants typically stay 2-3 feet tall, though some varieties reach 4-5 feet, making them well-suited to small spaces and discreet grows.
- No light management: Autos don't need a 12/12 light flip to trigger flowering, so there's no timer juggling or light schedule changes to worry about.
- Resilience: Ruderalis genetics give autoflowering weed plants natural tolerance to cold temperatures and environmental swings.
The tradeoffs are real, though. Average yields per plant are smaller than what you'd pull from a photoperiod strain. There's also little recovery time if something goes wrong. A week of overwatering or a nutrient burn early on cuts directly into your final result.
That said, marijuana seeds for beginners don't get much simpler than autos — no light management, a short lifecycle and ruderalis resilience offset most of that risk for new growers.
How to Start Autoflower Seeds
Autoflower seeds should go directly into their final container from day one to avoid transplant stress. Autos grow so fast that even a small shock from repotting can set the plant back by a week or more. And with an 8-14 week lifecycle, that loss is hard to recover.
In this section, you’ll learn about:
- Container size, drainage and soil for autoflowers.
- Germinating autoflower seeds.
- What to do after autoflower seeds germinate.
Choosing a Container and Soil for Autoflowers
Autoflowers perform best in 5-to-10-gallon fabric pots filled with light, well-draining soil. Fabric pots allow airflow to the root zone and drain excess moisture naturally, which helps prevent overwatering.
A good soil mix uses peat moss or coco coir, perlite and a small amount of compost — roughly 3 parts coco or peat, 2 parts perlite and 1 part compost. Keep soil pH between 6.0 and 6.5 to prevent nutrient lockout. If you're using a premixed cannabis substrate, check the label to confirm pH compatibility.
How to Germinate Autoflower Seeds
High-quality autoflower seeds germinate reliably using the paper towel method or direct-to-soil planting.
For the paper towel method:
Place your seeds between two damp (not soaked) paper towels and set them in a warm, dark spot at 70-78°F. Check every 12 hours. Most seeds crack and show a white taproot within 2 to 5 days, though the full range is 3 to 10 days depending on seed age, temperature consistency and media.
For direct planting:
Poke a hole about ½ inch deep in your moistened soil, drop the seed in and cover lightly. Keep temps consistent and the surface moist.
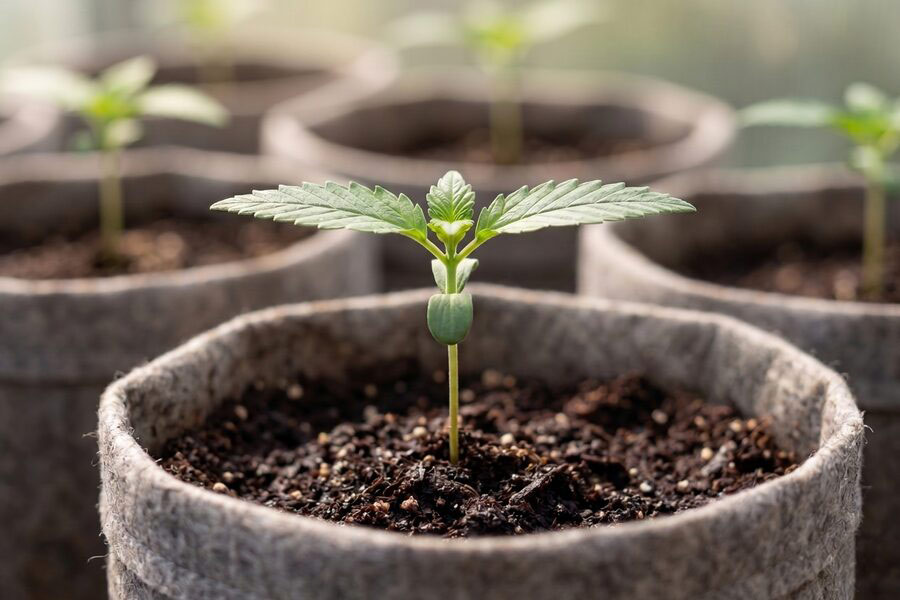
What to Do After Autoflower Seeds Germinate
Once autoflower seeds show a taproot of about ¼ to ½ inch, plant them root-tip-down in your final container at about ½ inch depth. Cover lightly with soil and mist the surface — don't flood it. Keep humidity at 70-80% and temperatures at 70-78°F.
The seedling will push through the soil in 1-3 days. Don't transplant at any point. Moving autos between containers causes stress they typically can't recover from within their short lifecycle.
Growing Autoflowers Indoors: Environment and Setup
Growing autoflowers indoors requires controlled lighting, temperature and humidity to complete the full grow cycle efficiently. The advantage of growing indoors is that you control every variable with no weather events, no seasonal light changes and no pest pressure from outside. With the right setup, you can run consistent harvests year-round.
In this section, you’ll uncover:
- The best light schedule for autoflowers indoors.
- Stage-by-stage temperature and humidity targets for autoflowers.
- The right nutrients for autoflowering plants.
What is the Best Light Schedule for Autoflowers Indoors?
Autoflowers indoors thrive on an 18/6 light schedule — 18 hours on, 6 hours off — from germination through harvest. You don't need to flip to 12/12 because autoflowers flower based on age, not darkness duration. Some growers run 20/4 or even 24 hours of continuous light, and both are fine. Autos don’t need a dark period.
Full-spectrum LED grow lights are the most practical choice: they're energy-efficient, run cool and don't require a spectrum swap between veg and flower. Keep the light at the manufacturer's recommended distance to avoid light stress or insufficient coverage.
Temperature and Humidity for Autoflowers
Autoflowers grow best at 70-85°F with 40-60% relative humidity during vegetative and early flowering stages. The specific targets shift as the plant matures. High humidity in late flower is the most common mold trigger (especially in dense bud sites) so dropping it in the final weeks matters.
The table below covers stage-specific environment targets for indoor grows.
| Stage | Weeks | Temperature (°F) | Relative Humidity |
| Seedling | 1-2 | 70-78 | 70-80% |
| Vegetative | 3-4 | 72-85 | 50-60% |
| Early flower | 5-7 | 70-85 | 40-55% |
| Late flower | 8-12 | 65-80 | 35-45% |
Use a thermohygrometer to monitor both temperature and humidity in real time. Oscillating fans improve airflow around developing buds and reduce hot spots in the canopy.
What Nutrients Do Autoflowering Plants Need?
Autoflowering plants require lighter nutrient doses than photoperiod strains because their root mass and lifecycle are shorter. Start with a light, airy substrate — a mix of coco or peat, perlite and compost works well.
- During weeks 1-4 (seedling and vegetative), use a nitrogen-forward nutrient formula at roughly half the recommended dose.
- Starting in week 5 as buds form, shift to a phosphorus and potassium-forward bloom formula and reduce nitrogen.
- In the final 1 to 2 weeks before harvest, many growers stop nutrients entirely and flush with plain pH-balanced water, with the aim of improving final flavor and smoothness.
Note that flushing is a debated practice; some growers prefer gradually tapering nutrients instead. Either approach is valid.
Growing Autoflowers Outdoors
Autoflowers grown outdoors need at least 6-8 hours of direct sunlight daily and a frost-free window of at least 10-12 weeks to finish comfortably. Their compact size and short lifecycle make them well-suited to balconies, patios and discreet garden spots where a large photoperiod plant wouldn't work.
Because autos flower based on age rather than daylight hours, you can start seeds almost any time during the warm season and still pull a full harvest before cold weather sets in.
Here are a few tips for growing autoflowers outdoors successfully:
- Use the same container and soil setup as you would indoors. A 5-to-10-gallon fabric pot with a light, well-draining mix keeps the root zone healthy and makes it easy to move the plant if weather turns.
- Water when the top inch of soil dries out, and factor in rainfall so you're not overwatering.
- Keep soil pH between 6.0 and 6.5.
- Nutrients follow the same schedule as indoor grows: nitrogen-forward early, phosphorus and potassium-forward once buds form, and either a plain-water flush or a gradual nutrient taper in the final 1 to 2 weeks.
The main variables you can't control outdoors are temperature swings and humidity spikes. Autoflowers tolerate moderate temperature and humidity variation reasonably well but in humid climates, they are still vulnerable to mold in late flower. Check bud sites regularly as harvest approaches.
How to Grow Autoflowers Week by Week
Autoflowers move through germination, vegetative, flowering and harvest stages in 8-14 weeks depending on the strain. The exact timeline varies — faster strains finish in 8-9 weeks while slower ones run up to 14 weeks.
Below, you’ll learn what to expect and what to do at each stage:
- Weeks 1-2: Germination and the seedling stage — fragile but critical.
- Weeks 3-4: Vegetative growth — root and foliage development.
- Weeks 5-7: The flowering stage — bud formation begins without a light flip.
- Weeks 8-12: Late flowering and harvest — trichome reading and timing the cut.
Weeks 1-2: Germination and Seedling Stage
The autoflower seedling stage lasts about 2 weeks, starting from the moment the seed cracks and the taproot emerges. Cotyledons (the small rounded seed leaves) appear first, followed by the first true leaves around day 7-10.
Don't add nutrients yet — the seedling draws what it needs from the seed and the soil. Water gently with a spray bottle rather than a full pour. Keep humidity at 70-80% and temps at 70-78°F. The seedling stage for autoflowers is the most fragile period in the grow, so keep handling minimal.
Weeks 3-4: Vegetative Stage
Autoflowers enter the vegetative stage around week 3 when true leaves replace cotyledons and root development accelerates. The plant builds structure fast during these 2 weeks — stems thicken, new leaf sets appear every few days and height increases from a few inches to 6-10 inches.
Start light nutrients at half the recommended dose, nitrogen-forward to fuel leaf and stem development. Low-stress training (LST) is appropriate here: gently tie down branches to flatten the canopy and expose more bud sites to your light. Don't top autoflowers. They don't have time to recover before flowering begins.
Weeks 5-7: Flowering Stage
Autoflowers begin flowering without any light cycle change, typically between weeks 3 and 5 after germination. You'll see it first as small white pistils (hairs) at the nodes where branches meet the main stem. These pistils are the earliest sign that buds are forming.
As weeks 5-7 progress, bud sites multiply, buds start to fatten and trichome production ramps up. Shift to a phosphorus and potassium-forward bloom nutrient formula. Drop humidity to 40-55% to reduce mold risk as bud density increases.
Also check regularly for hermaphrodites (banana-like structures emerging from bud sites) and remove any affected material immediately to protect the rest of the plant.
Weeks 8-12: Late Flowering and Harvest
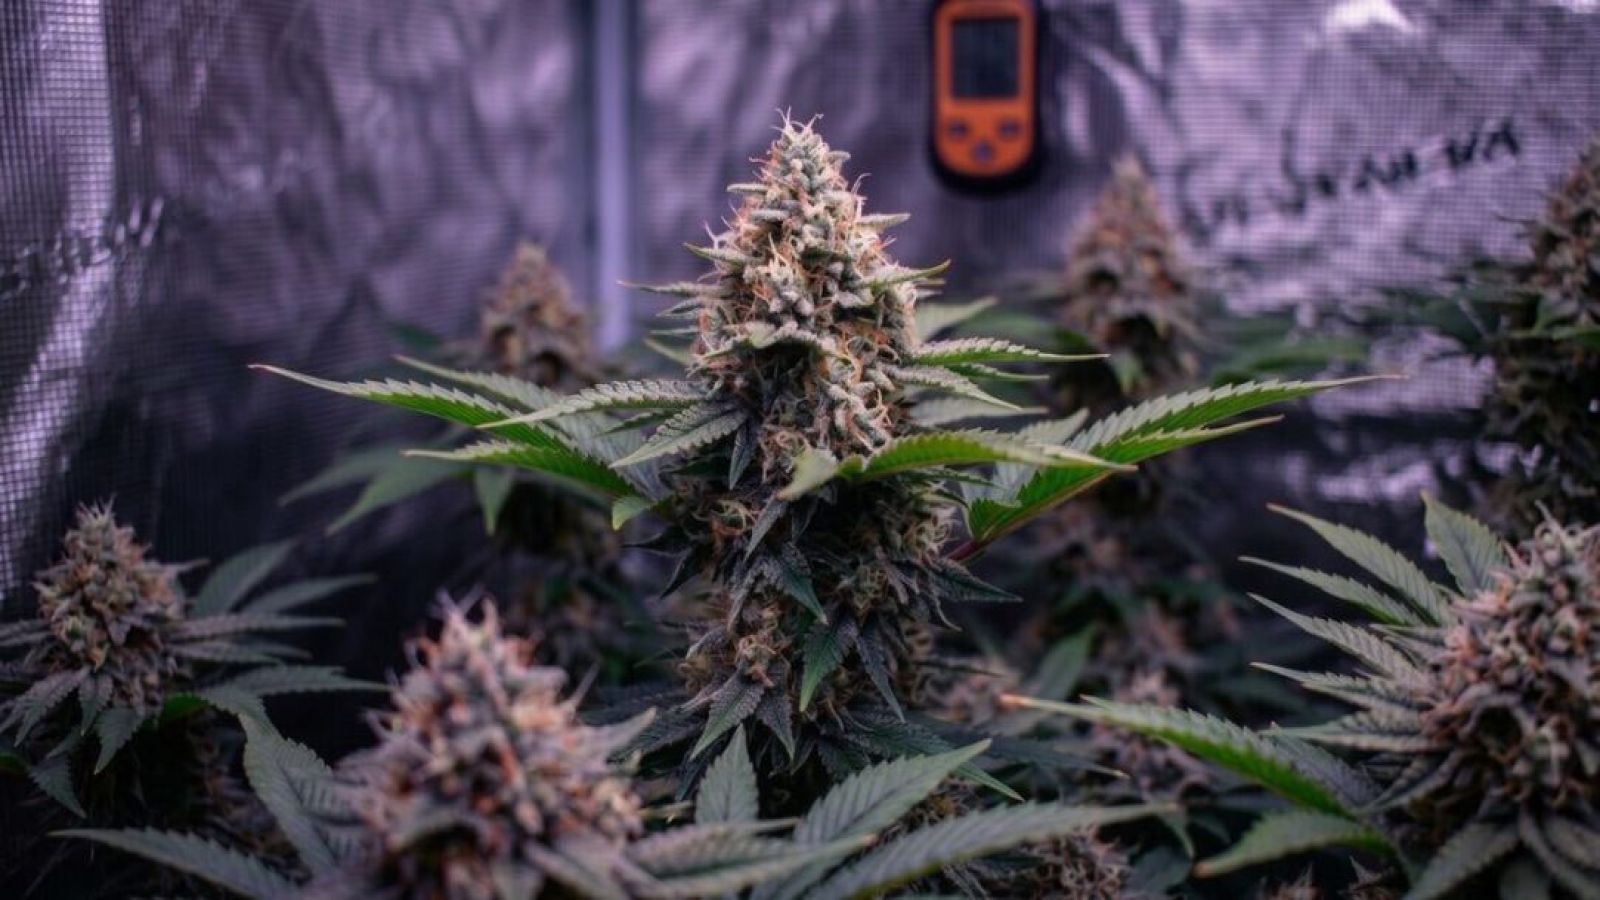
Autoflowers reach harvest readiness when most trichomes appear milky or cloudy, usually between weeks 8 and 12. In the final weeks, buds pack on the most weight and resin. Lower fan leaves yellow and drop naturally as the plant pulls stored nutrients upward toward the buds — this is normal and expected.
Stop all nutrients during this window, or taper them gradually — flushing with plain, pH-balanced water in the final 1 to 2 weeks is common practice, though its efficacy is debated. Use a jeweler's loupe (30x or higher) or a digital microscope to check trichomes on the bud itself, not on sugar leaves.
Harvest when 70-80% of trichomes are milky or cloudy and 10-20% show amber coloring. Milky trichomes are associated with peak cannabinoid levels. Amber trichomes reflect oxidation of terpenes and other compounds in the resin, producing a heavier, more sedative effect profile. More amber generally means a more relaxing harvest.
How to Harvest, Dry and Cure Autoflower Buds
Autoflower buds are ready to harvest when most trichomes shift from clear to milky and roughly 10-20% show amber coloring. Once you've confirmed the signal, cut the plant at the base or take individual branches. Trim away large fan leaves. The next two steps — drying and curing — determine the quality of what you end up with.
Drying Autoflower Buds
Autoflower buds dry correctly in a dark, ventilated space at 65-70°F and 50-60% humidity. Hang trimmed branches upside down and keep air moving with a fan, but don't point it directly at the buds.
Good airflow without direct blast reduces mold risk while keeping the drying process gradual. Drying takes 7-14 days depending on bud size, density and room conditions. Your buds are ready for curing when the small connecting stems snap cleanly instead of bending.
Curing Autoflower Buds
Autoflower buds cure in airtight glass jars for at least 2-4 weeks to develop full aroma and smoothness. Fill each jar about ¾ full to allow some air circulation inside. For the first 1-2 weeks, open the jars once or twice a day — called burping — to release built-up moisture and refresh the air inside.
As the buds stabilize, reduce burping to every 2-3 days. Store jars in a cool, dark location throughout the cure. The longer the cure, the more the terpene profile develops and the smoother the final smoke.
How Autoflowers Compare to Photoperiod Cannabis Seeds
Autoflowers differ from photoperiod cannabis seeds in three core attributes: flowering trigger, grow timeline and average yield potential. The comparison below helps you decide which seed type fits your goals.
| Attribute | Autoflowering seeds | Photoperiod seeds |
| Flowering trigger | Age-based (automatic) | Light cycle change (12/12) |
| Seed-to-harvest timeline | 8-12 weeks | 4-8+ months (including veg) |
| Average plant height | 2-3 feet | 3-6+ feet |
| Yields per plant | Smaller | Larger |
| Light schedule management | Not required | Required |
| Multiple harvests per season | Yes (outdoors) | Typically no |
| Recovery time from stress | Low | Higher |
Autoflowers are the practical choice when speed, size and simplicity matter. If maximizing yield per plant is the priority, feminized weed seeds run longer veg cycles and produce larger harvests (and high-yielding pot seeds are specifically bred for top-end output). Your grow space, timeline and goals determine which option fits.
Ready to Start? Pick the Right Autoflower Weed Seeds
Autoflowering cannabis seeds vary in THC potential, grow speed, yield size and resistance traits — so choosing the right strain shapes your results before you ever plant. Some autos finish in as little as 8 weeks, others clock in at 10-14 and produce denser buds.
Homegrown Cannabis Co. carries a full catalog of cannabis seeds including an extensive range of autoflowering marijuana seeds for eligible adult buyers where permitted by law. Browse by THC level, grow speed or yield size to find the genetics that match your setup. Prefer to skip germination? Explore our cannabis clones for a rooted head start.
FAQs
How Long is the Seedling Stage for Autoflowers?
The seedling stage for autoflowers lasts about 2 weeks from germination. Cotyledons appear first, followed by the first true leaves around day 7-10. Once true leaves are developing steadily, the plant has entered the vegetative stage.
How Tall Do Autoflowers Get Indoors?
Autoflowers typically grow 1-4 feet tall indoors. Height varies by strain and training method. Low-stress training during the vegetative stage can spread the canopy horizontally without adding height.
Can You Grow Autoflowers Outdoors?
Yes. Autoflowers grow well outdoors where they receive at least 6-8 hours of direct sunlight daily. Their short lifecycle lets you fit multiple harvests into a single warm season. Plant after the last frost date in your region and use fabric pots in well-draining soil.
How Often Should You Water Autoflowers?
Water autoflowers when the top inch of soil feels dry to the touch. Overwatering is one of the most common mistakes — soggy roots restrict oxygen and slow growth. Fabric pots help by draining excess moisture naturally.
Do Autoflowers Need Nutrients?
Yes, but at lower doses than photoperiod plants. Use a nitrogen-forward formula at half strength during weeks 1-4, then shift to a phosphorus and potassium-forward bloom formula from week 5 onward. Stop or gradually taper nutrients off in the final 1-2 weeks. Some growers also flush with plain water before harvest.